Welcome to the wonderful world of upcycling, where everyday items get a glamorous second act! If you’ve got a collection of glass jars gathering dust, you’re in the right place. We’re about to transform them into stunning vases with a project that’s perfect for beginners and seasoned crafters alike. Making repurposed mason jar crafts isn’t just a delightful way to spend an afternoon; it’s a powerful nod to sustainable living. By upcycling glass jars, we reduce landfill waste, conserve resources needed to produce new items, and add a uniquely personal touch to our spaces.
Mason jar crafts, in particular, have captured hearts and homes for good reason. Their classic shape, inherent sturdiness, and blank-canvas potential make them incredibly versatile. From rustic farmhouse charm to sleek modern minimalism, a repurposed mason jar can adapt to any style. Today, we’ll focus on creating a beautiful, simple vase that will brighten any nook or cranny.
Quick Guide: Create beautiful DIY repurposed mason jar vases! This easy tutorial shows you how to transform simple glass jars into stylish decor with twine, paint, or charms.
Why Embrace Repurposed Mason Jar Crafts? More Than Just a Pretty Vase
The allure of repurposed mason jar crafts goes far beyond aesthetics. It’s about a mindful approach to consumption and a celebration of creativity.
- Eco-Chic Champion: Every jar you upcycle is one less item heading to a landfill or requiring energy for recycling. Glass is infinitely recyclable, but repurposing it directly in your home saves even more resources and reduces your carbon footprint. It’s a small act with a significant environmental high-five!
- Budget-Friendly Beauty: Let’s be real, stylish decor can be expensive. Mason jars, often free after their initial use (hello, pasta sauce and pickles!), provide an almost zero-cost base for high-impact decorative pieces. Your wallet will thank you.
- Unleash Your Inner Artist: This isn’t about following rigid rules. It’s about expressing your unique style. Whether you prefer a minimalist look or a bohemian explosion of color and texture, mason jars are wonderfully accommodating.
- Gifts from the Heart: A handcrafted mason jar vase, filled with fresh blooms or even thoughtful trinkets, makes a deeply personal and charming gift for any occasion. It shows care, effort, and a touch of eco-consciousness.
- Versatility is Key: While we’re focusing on vases today, remember that these decorated jars can serve countless purposes – pencil holders, kitchen utensil organizers, candle holders, or even party favor containers.
Essential Materials for Your Repurposed Mason Jar Crafts
Gathering your supplies is the first step to upcycling magic! The beauty of this project lies in its simplicity and the use of readily available materials.
- Clean Mason Jar(s): Any size or shape will do! Whether it’s a classic Ball jar, a pasta sauce jar, or a jam jar, just make sure it’s glass.
- For Decoration (Choose one or combine!):
- Jute Twine or Natural Rope: For a rustic, farmhouse, or coastal vibe.
- Acrylic Paints or Chalk Paint: For a solid color, distressed look, or intricate designs.
- Spray Paint: For a quick, even coat of color (ensure good ventilation).
- Decorative Charms, Buttons, or Beads: To add a touch of personality.
- Ribbon or Lace: For a softer, more romantic feel.
- Scissors: For cutting twine, ribbon, etc.
- Hot Glue Gun & Glue Sticks: Essential for securely attaching twine and embellishments. (White craft glue can work for some applications but takes longer to dry).
- Plant or Floral Filler: Fresh flowers, dried botanicals, faux stems, or even pretty branches.
- Optional:
- Rubbing Alcohol: For ensuring the jar surface is impeccably clean before painting.
- Paintbrushes: Various sizes if you’re hand-painting.
- Sandpaper (Fine Grit): If you want to distress a painted finish.
- Clear Coat Sealant (Spray or Brush-on): To protect your painted design and add durability, especially if the vase will be near water or handle_d_o_frequently.
How to Create Your Repurposed Mason Jar Crafts: A Step-by-Step Guide
Ready to transform that plain jar into a piece of art? Let’s get crafting! This process is wonderfully adaptable, so feel free to let your creativity flow.
Step 1: The Squeaky-Clean Start
- Remove Labels: This can sometimes be the trickiest part! Soak the jar in hot, soapy water for 15-30 minutes to loosen the label and adhesive. If stubborn residue remains, try a mixture of baking soda and cooking oil made into a paste, let it sit, then scrub off. Goo Gone or a similar product also works wonders.
- Wash Thoroughly: Wash the inside and outside of the jar with warm, soapy water. Rinse well.
- Sanitize & Dry (Optional but Recommended): For a super clean surface, especially if painting, wipe the exterior with rubbing alcohol on a lint-free cloth. This removes any lingering oils or fingerprints. Let the jar dry completely.
Step 2: Choose Your Decorative Destiny
What style are you aiming for? This will guide your next steps:
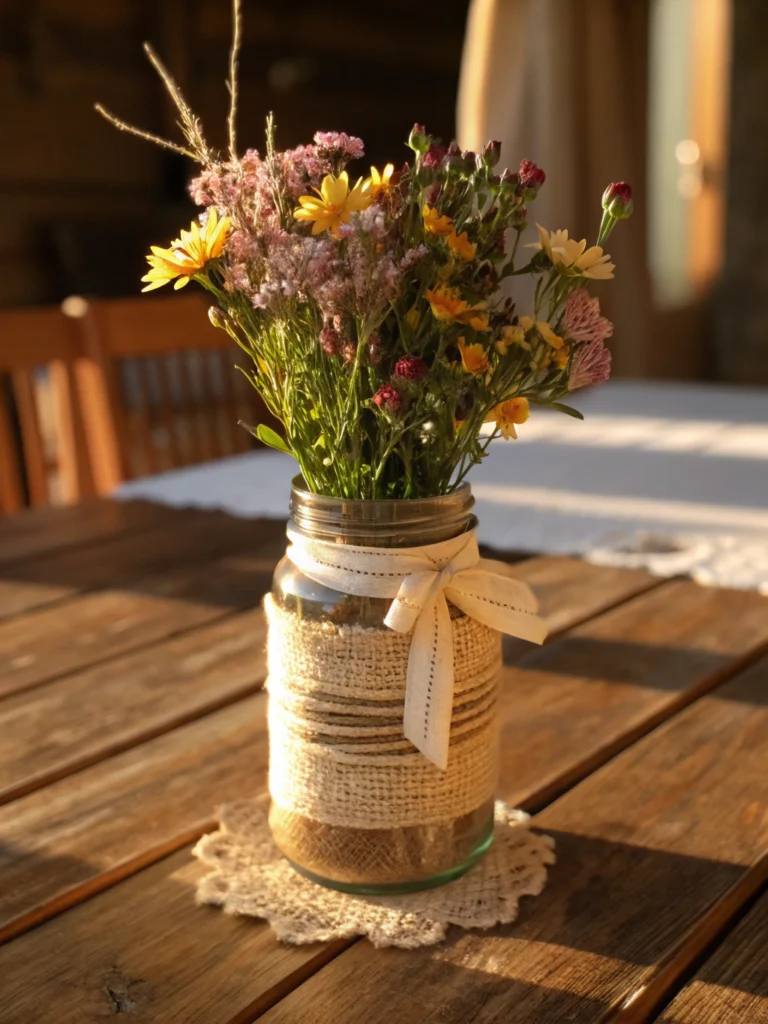
- Jute Twine Wrap: Perfect for a rustic, farmhouse, or nautical look. Simple, textured, and timeless.
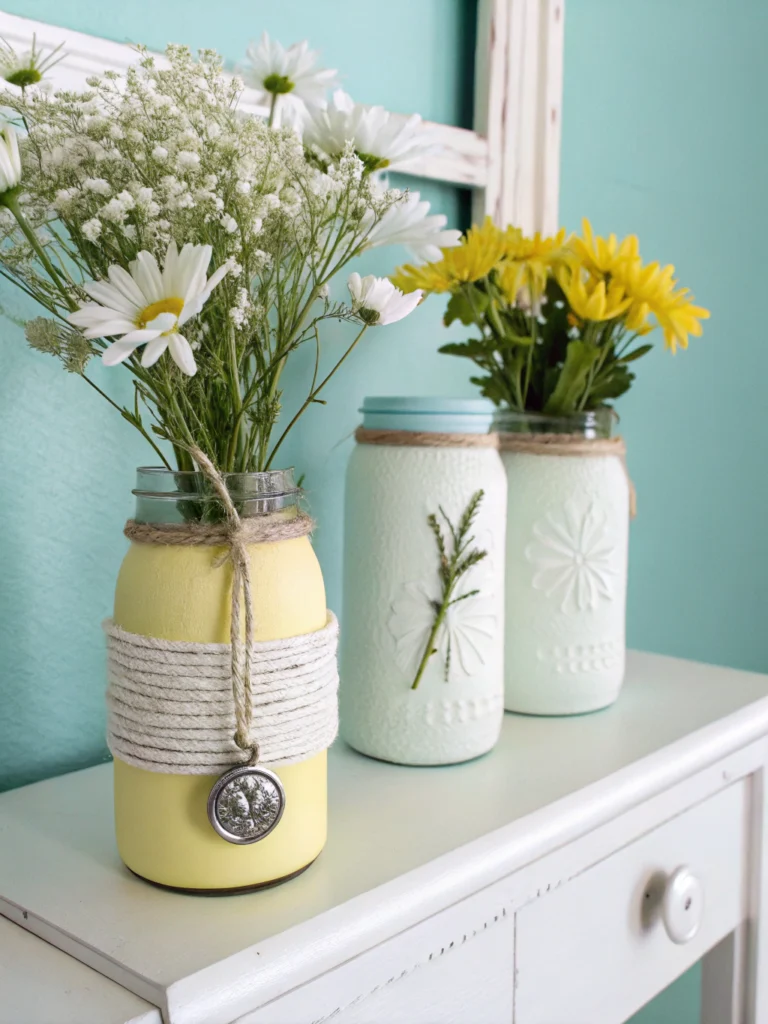
- Painted Perfection: Offers endless color possibilities. You can go for a solid coat, stripes, polka dots, or even try your hand at a more intricate design. Chalk paint is excellent for a matte, easily distressed finish.
- Charm & Ribbon Elegance: A quicker method that adds subtle detail. Great for a shabby chic or delicate aesthetic.
- Combination Creation: Why not mix methods? A painted jar with a twine-wrapped neck and a small charm can look fantastic.
Step 3: Apply Your Chosen Decoration
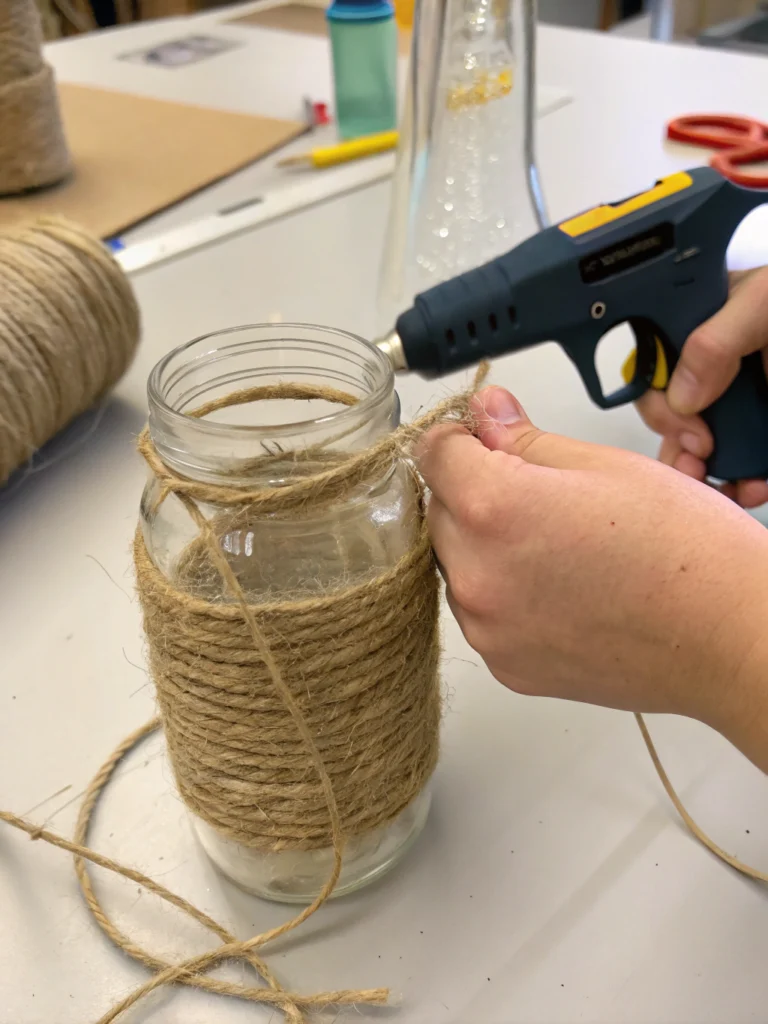
- For a Jute Twine Wrap:
- Apply a small dot of hot glue near the bottom edge of the jar to secure the starting end of your twine.
- Carefully and tightly begin wrapping the twine around the jar, keeping the rows snug against each other. Apply small dots of hot glue every few rows, especially at the beginning and end of curves (like the neck of the jar), to keep the twine secure.
- Continue wrapping until you reach your desired height – you can cover the entire jar, just the bottom half, or create bands of twine.
- When finished, cut the twine and secure the end with another dot of hot glue, tucking it neatly.
- For a Painted Design:
- Ensure your jar is impeccably clean and dry.
- If using acrylic or chalk paint that requires priming for glass, apply a thin coat of appropriate primer first and let it dry completely. Some multi-surface paints adhere well to glass without primer.
- Apply thin, even coats of your chosen paint. It’s better to do 2-3 thin coats than one thick, goopy one, as this prevents drips and ensures better adhesion. Let each coat dry thoroughly according to the paint manufacturer’s instructions before applying the next.
- For a distressed look (popular with chalk paint), once the final coat is dry, lightly sand the raised edges or random spots with fine-grit sandpaper until you achieve the desired effect.
- For Charm Embellishment (often combined with other methods):
- This is usually one of the final touches. See Step 4.
Step 4: Add Extra Flair – Embellishments!
This is where you can really personalize your vase!
- Ribbons & Lace: Tie a simple bow around the neck of the jar or wrap a band of lace around the middle, securing it with a dab of hot glue at the back.
- Charms & Buttons: Use a short piece of thinner twine or wire to attach a small charm to the main twine wrap or to a ribbon. Alternatively, hot glue a cute button directly onto the jar or twine.
- Painted Accents: Once your base paint coat is dry, you can add hand-painted details, stencils, or even use paint pens for finer lines.
Step 5: Style with Stems
Now for the grand finale – filling your new vase!
- Fresh Florals: A classic choice. Add a little water and arrange your favorite fresh-cut flowers.
- Faux Florals & Greenery: A great low-maintenance option that provides year-round beauty.
- Dried Botanicals: Pampas grass, lavender, or dried eucalyptus can add a sophisticated, natural touch.
- Bare Branches: In winter, minimalist branches can look surprisingly chic.
Step 6: Seal for Durability (Optional)
- If you’ve painted your jar or want extra protection for your twine, consider applying a clear acrylic sealant.
- Choose a matte, satin, or gloss finish depending on your preference. Spray sealants are often easiest for an even coat.
- Apply in a well-ventilated area according to the product instructions, and let it cure completely. This will help protect against moisture and chipping, making your vase last longer.
Styling Your Upcycled Mason Jar: Beyond the Vase
Your beautifully repurposed mason jar doesn’t have to be just a vase! Its versatility is a huge part of its charm. Here are a few quick ideas:
- Charming Kitchen Storage: Use larger painted or twine-wrapped jars to hold wooden spoons, spatulas, or even dry goods like pasta or beans (ensure they have a proper sealing lid if used for food).
- Stylish Desk Organizer: Keep pens, pencils, scissors, and other office supplies tidy in a decorated jar. A set of three in varying heights looks particularly smart.
- Dreamy Party Centerpieces: Create a collection of these vases for your next gathering. Fill them with simple flowers, candles (ensure safety!), or even fairy lights for a magical glow. They make affordable and impactful table decor.
- Bathroom Vanity Tidy: Perfect for holding cotton balls, Q-tips, makeup brushes, or toothbrushes. A clear sealant is definitely recommended here due to moisture.
The Beauty of Breathing New Life: Sustainability in Crafting
Embracing repurposed mason jar crafts is a beautiful expression of conscious consumerism. In a world grappling with waste, every act of upcycling matters. Instead of discarding an empty jar, we’re choosing to see its potential, to invest a little time and creativity, and to transform it into something both useful and beautiful.
This isn’t just about saving one jar from the landfill; it’s about fostering a mindset of resourcefulness. When we start looking at everyday objects through an upcycling lens, we unlock a world of creative possibilities. That old t-shirt, those tin cans, the broken ceramic – they all hold the potential for a new life, a new purpose. This simple mason jar project is a gateway to understanding the immense value in what we already possess and the joy that comes from making something new out of the “old.” It’s a gentle reminder that sustainability can be stylish, fun, and deeply rewarding.
Share Your Sustainable Style!
And there you have it – a simple, sustainable, and incredibly stylish DIY repurposed mason jar vase! We hope this guide has sparked your imagination and shown you just how easy it is to add a touch of handcrafted charm to your home while being kind to our planet.
Ready to dive deeper into the world of creative reuse? Explore our “20 Innovative Ways to Upcycle Old Denim Jeans” for your next sustainable fashion project, or discover “How to Turn Wine Bottles into Stunning Garden Edging” for an outdoor glow-up!
We would be absolutely thrilled to see your repurposed mason jar creations! Snap a photo and share it on your favorite social media platform using the hashtag #MasonJarMagic (or your preferred community tag) and don’t forget to tag us. Your creativity could inspire someone else to start their own upcycling journey!
For more easy upcycling tutorials, sustainable living tips, and home decor inspiration, be sure to subscribe to our newsletter. Let’s make the world a little more beautiful, one repurposed item at a time!
Happy Crafting!