Introduction
Are you tired of clutter and yearning for a stylish, yet simple, storage solution? Look no further! Building a DIY wooden crate shelf is a fantastic weekend project that adds rustic charm and practical organization to any room. This project is perfect for beginners and seasoned DIYers alike, offering a quick win and a beautiful, functional piece of furniture. Forget expensive store-bought shelves; we’ll show you how to transform humble wooden crates into a stunning display and storage unit. Get ready to roll up your sleeves and create something amazing for your home!
This guide will walk you through an easy-to-follow process, ensuring your DIY wooden crate shelf turns out perfectly. We’ll cover everything from selecting your crates to the final touches, making this a stress-free and enjoyable experience. Imagine the satisfaction of stepping back to admire a beautiful shelf you built with your own hands!
Table of Contents
Table of Contents

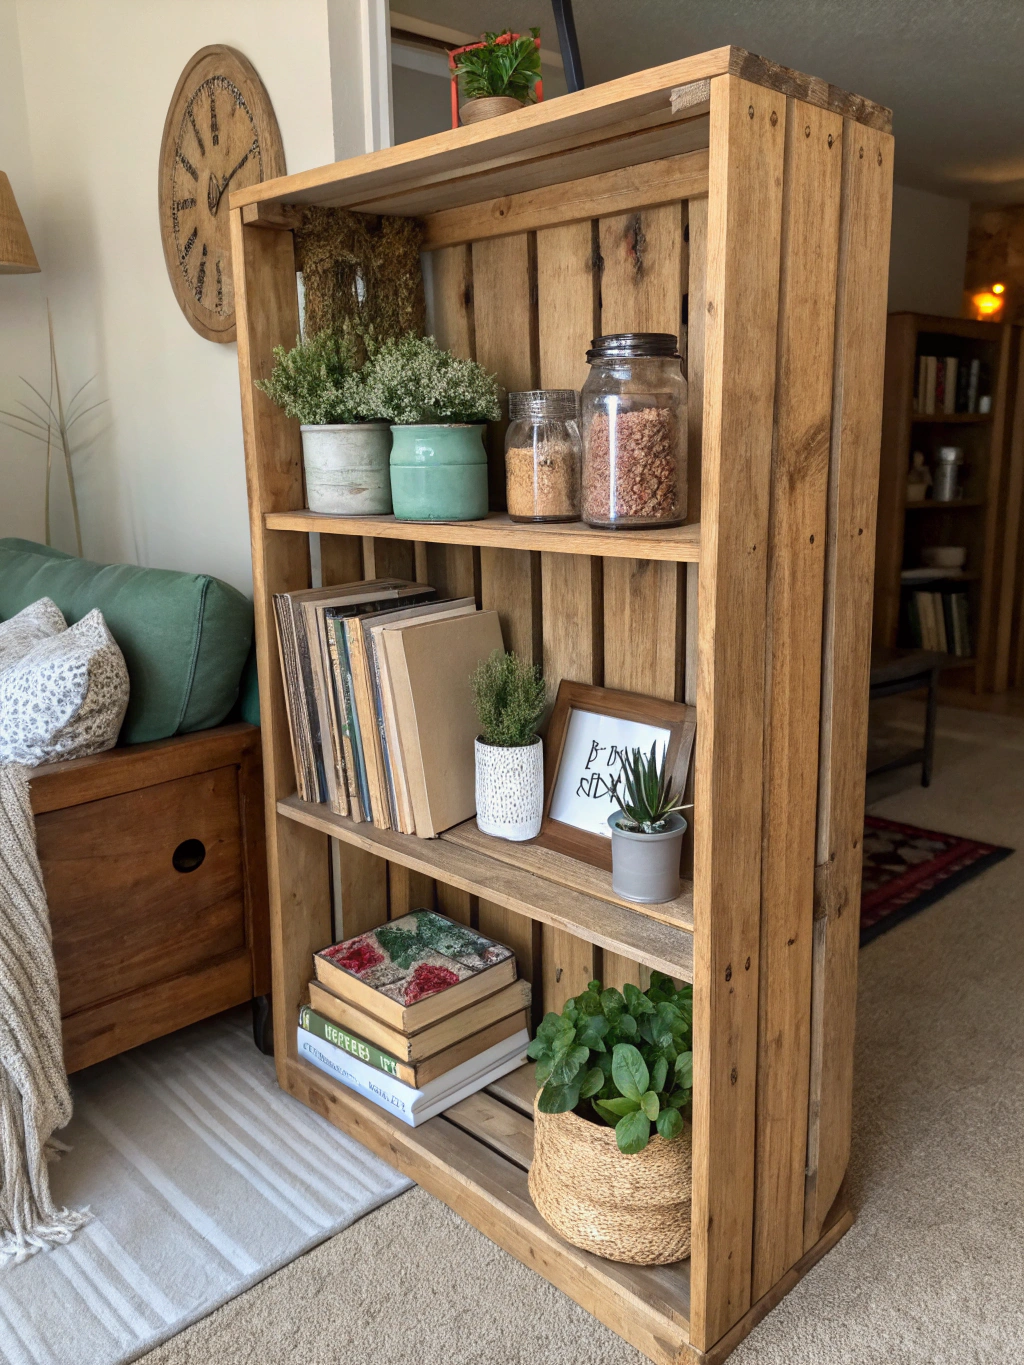
Caption: Your finished DIY wooden crate shelf can be a stunning and functional addition to any room.
What You’ll Need for Your DIY Wooden Crate Shelf
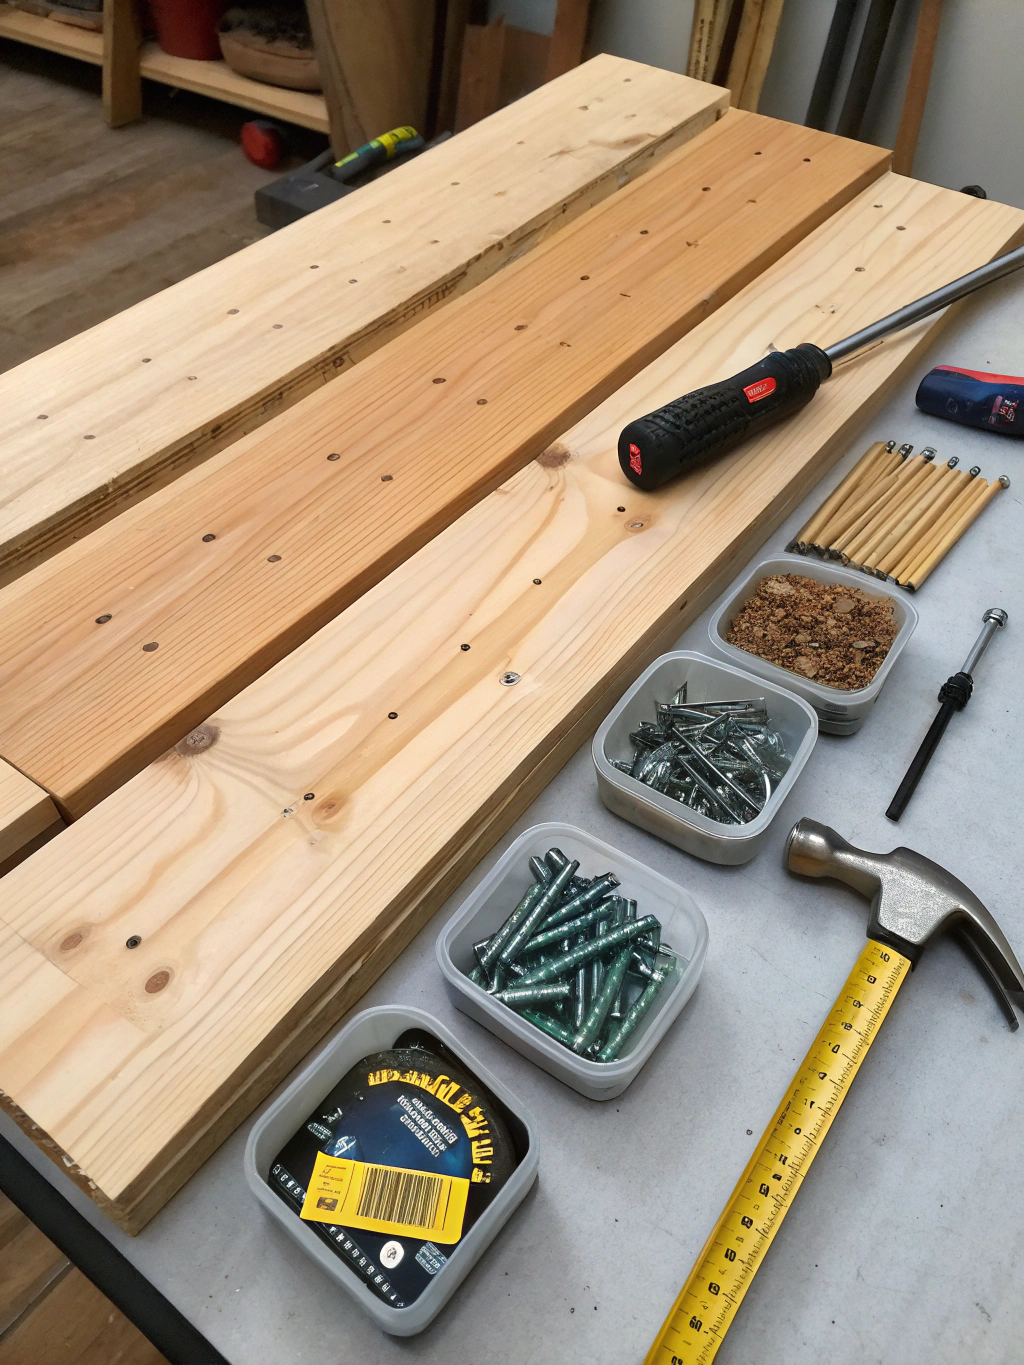
Before we dive into the fun part, let’s gather our supplies. Having everything ready will make the process much smoother. You’ll be surprised how few items you need to create a fantastic DIY wooden crate shelf.

Caption: Gather these essential materials and tools to start building your DIY wooden crate shelf.
Materials:
- Wooden Crates: The star of the show! You’ll need 3-6, depending on your desired shelf size. Look for sturdy, untreated pine crates. They are readily available at most craft stores or home improvement centers.
- Sandpaper: Medium-grit (around 120-150) and fine-grit (220) for a smooth finish.
- Wood Stain or Paint (Optional): Choose a color that complements your home decor.
- Paintbrushes or Rags: For applying stain or paint.
- Wood Glue: A strong adhesive like Titebond II or III is recommended.
- Screws: 1 ¼ inch wood screws will generally work well, but adjust based on your crate thickness.
- Clamps (Optional but Recommended): To hold crates together while the glue dries. Bar clamps or C-clamps work well.
- Picture Hanging Strips or L-Brackets: For securing the shelf to the wall (highly recommended for stability, especially if you have kids or pets).
- Cleaning Cloths: For wiping away dust and excess stain.
Tools:
- Drill/Driver: With drill bits and a Phillips head bit.
- Measuring Tape: Accuracy is key!
- Pencil: For marking.
- Safety Glasses: Always protect your eyes.
- Gloves: To protect your hands, especially when staining.
- Level: To ensure your shelf is perfectly straight.
Many people find inspiration for their “DIY wooden crate shelf plans, Easy wooden crate shelf tutorial, How to build a wooden crate shelf,” from various online resources. These can offer different configurations and finishing ideas.
Step-by-Step Guide to Building Your DIY Wooden Crate Shelf
Alright, DIY enthusiasts, let’s get building! Follow these simple steps, and you’ll have your very own DIY wooden crate shelf in no time.
Step 1: Prepare Your Crates

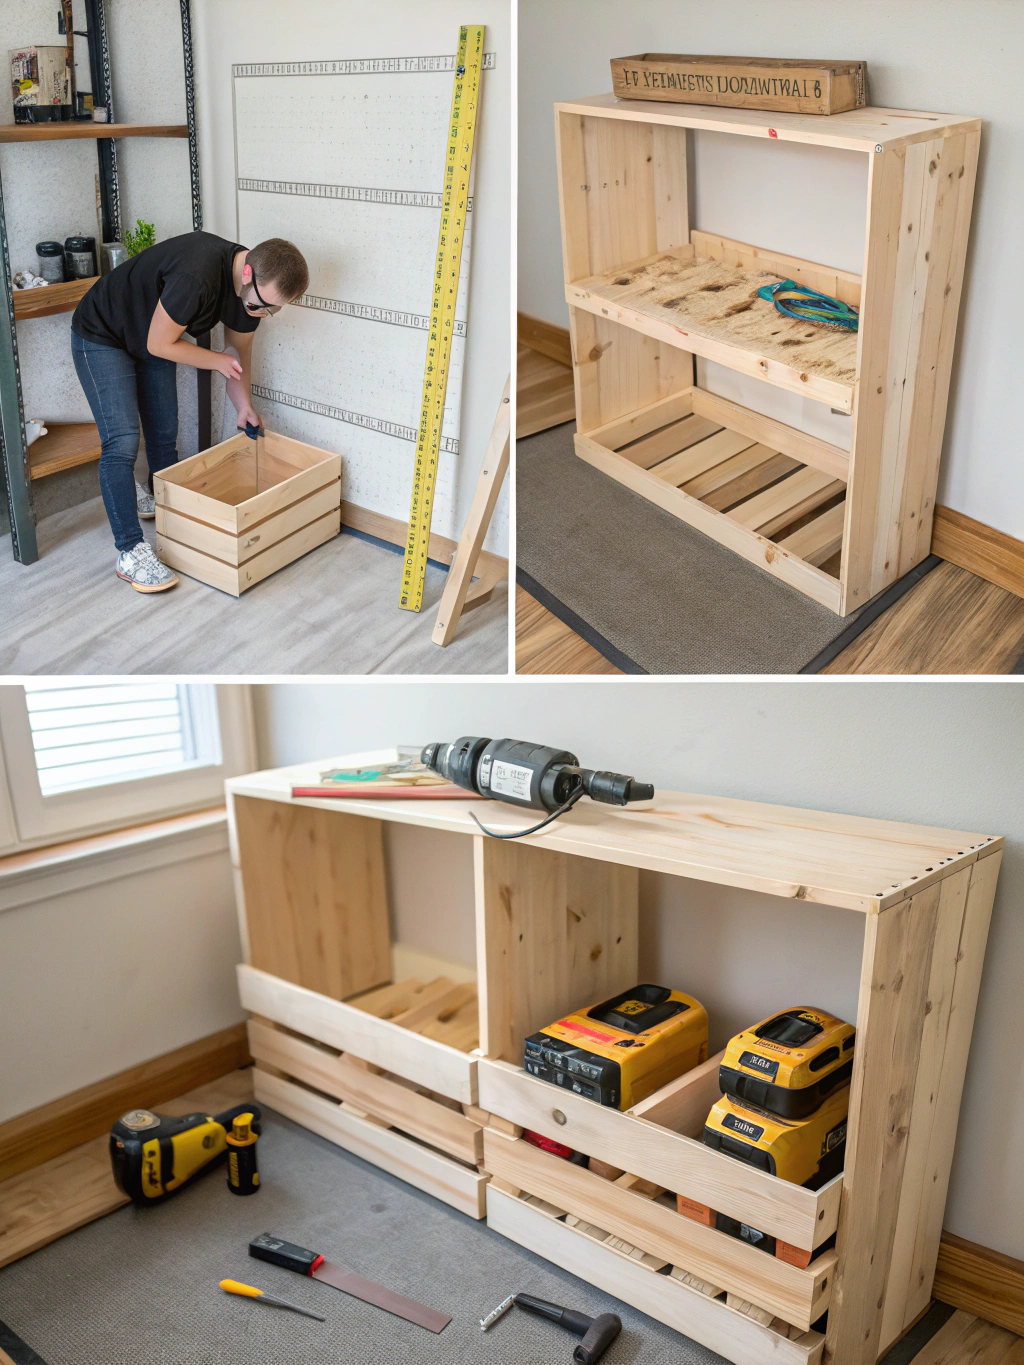
Caption: Step 1 – Sanding your wooden crates is crucial for a smooth, professional finish on your DIY wooden crate shelf.
First things first, preparation is key to a professional-looking finish. Even if your crates look relatively smooth, take the time to sand them. Start with medium-grit sandpaper to smooth out any rough patches, splinters, or imperfections. Pay extra attention to the edges and corners.
Once you’ve gone over all surfaces with the medium-grit, switch to fine-grit sandpaper for a silky-smooth feel. This step not only improves the crate’s appearance but also prepares the wood to accept stain or paint more evenly. After sanding, wipe down each crate thoroughly with a clean, damp cloth to remove all dust. Let them dry completely before moving on.
A common pitfall here is rushing the sanding process or skipping it altogether. This can result in a rough finish, splinters, and uneven paint or stain application. Taking an extra 15-20 minutes for proper sanding makes a world of difference.
Step 2: Plan Your Configuration & Pre-Drill (Optional but Recommended)
Now, it’s time to visualize your masterpiece! Before you start joining crates, decide on the configuration of your DIY wooden crate shelf. Will it be a tall, narrow tower? A wider, lower unit? Play around with arranging the crates on the floor until you find a layout you love. Consider the space where the shelf will go and what you plan to store on it.
Once you’ve settled on a design, it’s a good idea to pre-drill pilot holes where you plan to insert screws. This step is especially important for softer woods like pine, as it prevents the wood from splitting when you drive in the screws. Mark the spots where crates will join, then use a drill bit slightly smaller than your screw diameter to drill pilot holes.
Think about stability. If you’re creating a taller shelf, ensure it has a stable base. You might want to stagger the crates or add extra support. For more complex “DIY wooden crate shelf plans, Easy wooden crate shelf tutorial, How to build a wooden crate shelf,” you might find detailed diagrams that can help with this stage.
Step 3: Stain or Paint Your Crates (Optional)
If you’re opting for a colored or stained finish, now is the time to do it – before assembly. It’s much easier to get even coverage on all surfaces when the crates are separate. Whether you’re using wood stain or paint, ensure you’re in a well-ventilated area and wearing gloves.
For staining, apply the stain with a brush or a clean rag, following the grain of the wood. Let it sit for the time recommended on the product instructions, then wipe off any excess with a clean rag. The longer you leave the stain on, the deeper the color will be. For painting, apply a thin, even coat. You might need a second coat for full coverage; let the first coat dry completely before applying the next.
Allow your crates to dry thoroughly according to the manufacturer’s instructions. This could take several hours or even overnight. Rushing this step can lead to smudged finishes and problems during assembly. Patience here will pay off with a beautifully finished DIY wooden crate shelf.
Step 4: Assemble Your DIY Wooden Crate Shelf
This is where your DIY wooden crate shelf really starts to take shape! Begin assembling your crates according to the configuration you planned in Step 2.
Apply a generous bead of wood glue to the surfaces where two crates will meet. Press the crates firmly together. If you have clamps, use them to hold the crates tightly in place while the glue sets. This ensures a strong bond.
Next, drive your wood screws through the pre-drilled pilot holes (or drill new ones if you skipped that step) to secure the crates together. Use at least two screws per joining side for stability. Wipe away any excess glue that squeezes out with a damp cloth before it dries. Continue this process, adding one crate at a time, until your shelf is fully assembled.
Double-check that everything is level and aligned as you go. It’s easier to make small adjustments during assembly than to try and fix a wobbly shelf later.
Step 5: Finishing Touches & Wall Mounting
Your DIY wooden crate shelf is almost complete! Once the glue has fully cured (check the glue manufacturer’s instructions, usually 24 hours), give your shelf a final inspection. You can do any touch-up sanding or painting if needed. Your easy wooden crate shelf tutorial is nearly complete!
For safety and stability, especially if your shelf is tall or you plan to store heavy items, it’s highly recommended to secure it to the wall. Use L-brackets underneath some of the upper crates, screwing them into the crate and then into a wall stud. Alternatively, strong picture hanging strips can work for lighter configurations, but ensure they are rated for the weight you anticipate. Use a level to make sure your shelf is perfectly straight before securing it.
If you want to add extra protection to your shelf, especially if it will be in a high-traffic area or hold items that could scratch the wood (like an entryway or mudroom), consider applying a coat of clear polyurethane sealer. This will protect the wood and make it easier to clean.
Your Stunning Final Result!
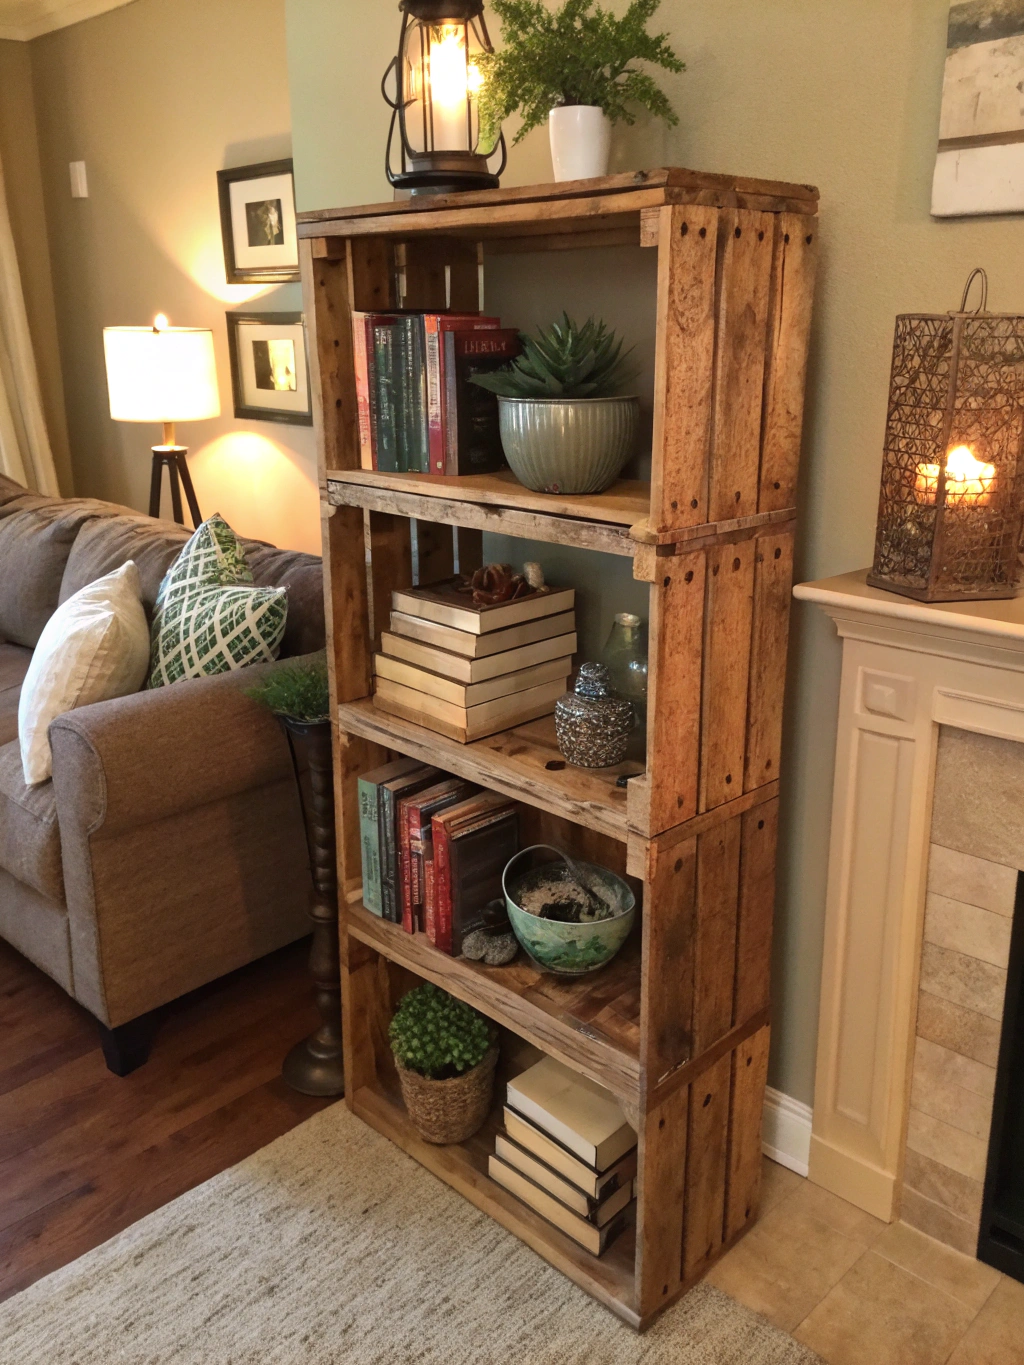
And there you have it! Step back and admire your beautifully crafted DIY wooden crate shelf. You’ve successfully transformed simple wooden crates into a stylish and functional piece of furniture that adds personality and organization to your home.

Caption: The beautiful final result – your very own custom-built DIY wooden crate shelf, ready to organize and decorate your space!
This project not only provides a practical storage solution but also offers immense satisfaction. Think of all the possibilities – use it for books in the living room, towels in the bathroom, toys in the kids’ room, or even as a rustic pantry organizer. The versatility of a DIY wooden crate shelf is one of its best features.
We’d love to see how your project turned out! Share a photo of your completed DIY wooden crate shelf in the comments below, or tag us on social media. Got any unique tips or modifications you made? Share those too – let’s inspire each other!
Pro Tips & FAQs for Your DIY Wooden Crate Shelf
Building a DIY wooden crate shelf is straightforward, but here are a few extra tips and answers to common questions to help you achieve the best possible results.
(Collapsible Section 1: Sourcing Crates)
Q1: Where can I find affordable wooden crates for my DIY shelf?
Great question! You can often find new, unfinished wooden crates at craft stores like Michaels or Hobby Lobby, home improvement stores like Home Depot or Lowe’s, and even online retailers like Amazon. For a more rustic or vintage look, check out flea markets, antique stores, or local classifieds. Sometimes wineries or grocery stores have used crates they are willing to part with, often for free or a very low cost – just make sure they are clean and sturdy!
(Collapsible Section 2: Customization)
Q2: How can I customize my DIY wooden crate shelf further?
The sky’s the limit! Besides staining or painting, consider these ideas:
- Stenciling: Add patterns, words, or numbers to the crates.
- Decoupage: Apply fabric or paper cutouts for a unique look.
- Add Backing: Attach thin plywood or decorative scrapbook paper to the back of some or all crates for a more enclosed feel or a pop of color.
- Install Casters: Make your shelf mobile by adding small wheels to the bottom crate.
- Vary Crate Orientation: Mix horizontal and vertical crate placements for a more dynamic design. This is a key element in many “[DIY wooden crate shelf plans, Easy wooden crate shelf tutorial, How to build a wooden crate shelf,](https://www.hgtv.com/design/make-and-celebrate/handmade/diy-decor-projects-to-craft-this-weekend-pictures)” you might find online.
(Collapsible Section 3: Stability for Taller Shelves)
Q3: My DIY wooden crate shelf is quite tall. How do I ensure it’s stable and won’t tip over?
Excellent point – safety first! For taller configurations (anything over three crates high, or if you have children or pets), wall anchoring is crucial.
- L-Brackets: Use L-brackets to secure the top-most crates (or several crates along the height) to wall studs. This is the most secure method.
- Furniture Straps: Anti-tip furniture straps are another good option.
- Wider Base: Design your shelf with a wider base than the top. For example, use three crates at the bottom row, two in the middle, and one at the top to create a pyramid shape.
- Weight Distribution: Place heavier items on the lower shelves to lower the center of gravity.
(Collapsible Section 4: Best Wood Type)
Q4: What type of wood are most craft crates made of, and is it good for a shelf?
Most readily available craft crates are made from pine or a similar softwood. Pine is lightweight, affordable, and easy to work with (sanding, staining, drilling), making it ideal for a beginner-friendly project like a [DIY wooden crate shelf](https://www.fixdiy.site/home-decor/). While not as durable as hardwoods, it’s perfectly adequate for most shelving needs, especially for decorative items, books, and general storage. If you find crates made of a harder wood, they will be more durable but might be a bit more challenging to drill into without pre-drilling.
(Collapsible Section 5: Avoiding Common Mistakes)
Q5: What are some common mistakes to avoid when attempting an easy wooden crate shelf tutorial?
Several common pitfalls can be easily avoided:
- Skipping Sanding: This results in a rough finish and potential splinters.
- Not Pre-Drilling: Especially with softwoods like pine, screws can split the wood if pilot holes aren’t drilled.
- Uneven Staining/Painting: Caused by not cleaning dust after sanding or applying coats too thickly.
- Ignoring Leveling: Assembling crates without checking for level can result in a wobbly, crooked shelf.
- Insufficient Fastening: Not using enough screws or relying solely on glue for a large shelf can compromise stability.
- Not Anchoring to the Wall: This is a safety hazard, particularly for taller shelves or in homes with children/pets.
By following each step carefully in any “[DIY wooden crate shelf plans, Easy wooden crate shelf tutorial, How to build a wooden crate shelf,](https://www.hgtv.com/design/make-and-celebrate/handmade/diy-decor-projects-to-craft-this-weekend-pictures)” you can avoid these issues.
We hope these tips and FAQs help you on your DIY wooden crate shelf building journey! If you’re looking for more inspiration or detailed tutorials on similar home decor projects, be sure to check out other resources on home improvement.
Get Creative and Share Your Work!
Building your own DIY wooden crate shelf is more than just a project; it’s an opportunity to add a personal touch to your living space and create something truly unique. The beauty of DIY is the ability to customize it to perfectly fit your style and needs.
Don’t be afraid to experiment with different configurations, finishes, or embellishments. This is your creation! What will you store on your new shelf? How will it transform your room?
We’d love to hear from you!
- Share your creations: Post a picture of your finished DIY wooden crate shelf in the comments below or tag us on social media using #MyFixDIYShelf.
- Ask questions: If you run into any snags or have questions, drop them in the comments – our community is here to help!
- Subscribe for more: Want more easy and inspiring DIY projects like this one? Sign up for our newsletter to get the latest tutorials, tips, and tricks delivered straight to your inbox!
Happy building, and enjoy your new DIY wooden crate shelf!


