
again.
Introduction
Are you staring at a towering stack of scratched, unwanted CDs and DVDs, wondering what to do with them? Before you toss them in the bin, consider this: those shimmering discs hold the potential for stunning old CD mosaic projects! It’s a fantastic way to declutter, unleash your creativity, and add a unique, eco-friendly touch to your home decor. Many home improvement enthusiasts are always looking for ways to repurpose items, and these old CD mosaic projects offer a dazzling solution. We’ll explore seven creative DIY ideas that are not only fun to make but also result in beautiful, eye-catching pieces. Get ready to transform your old media into treasure!
Table of Contents
Table of Contents
Old CD Mosaic Projects
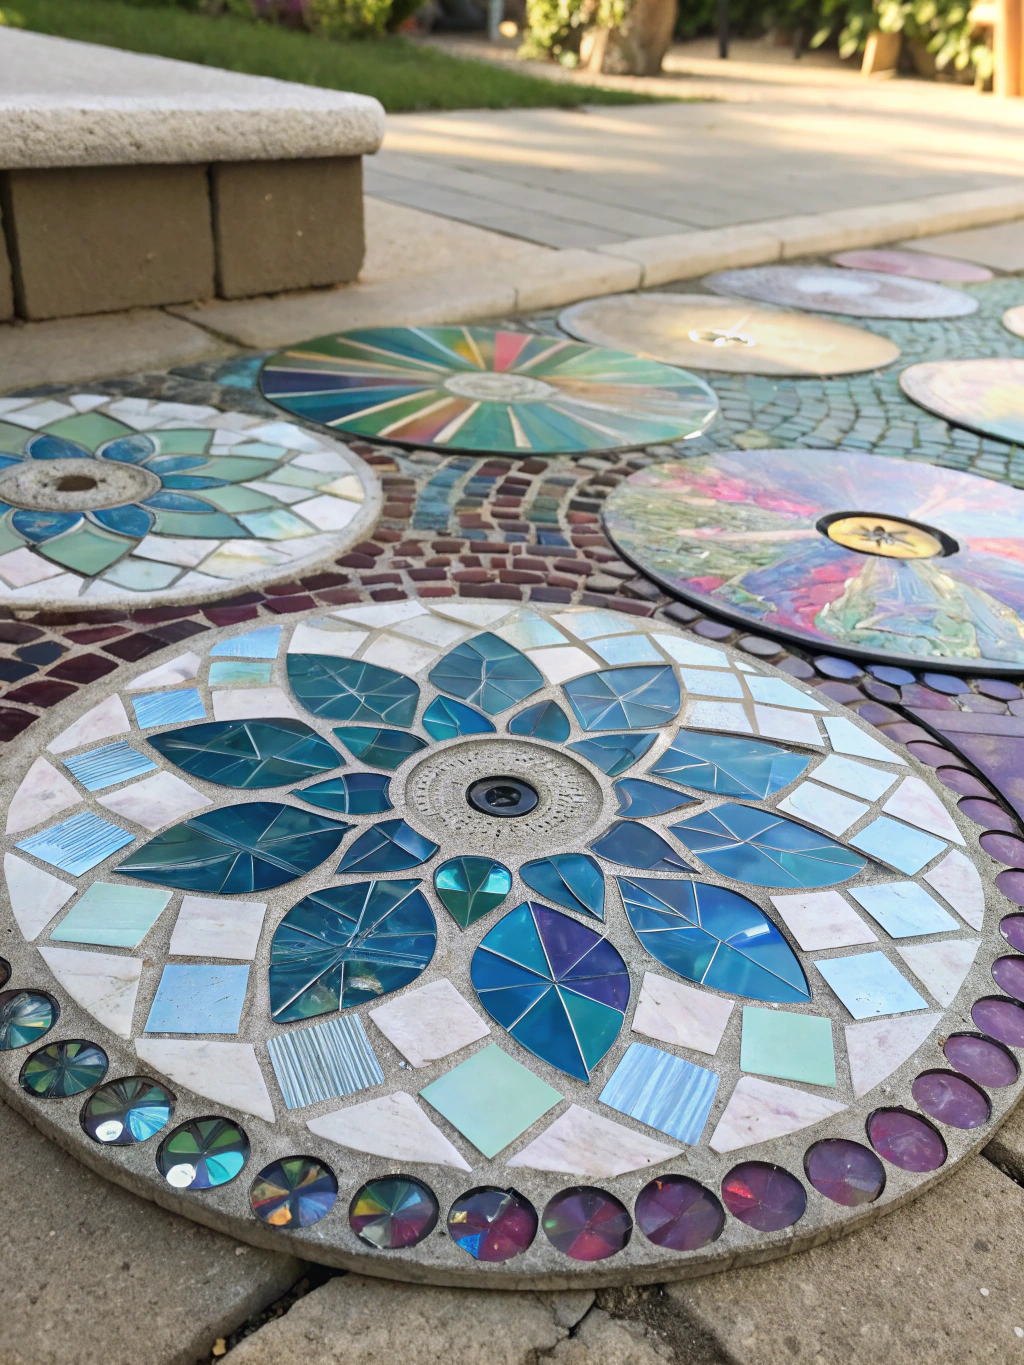 "Old CD Mosaic Projects: 7 Creative DIY Ideas to Try Now! 1")
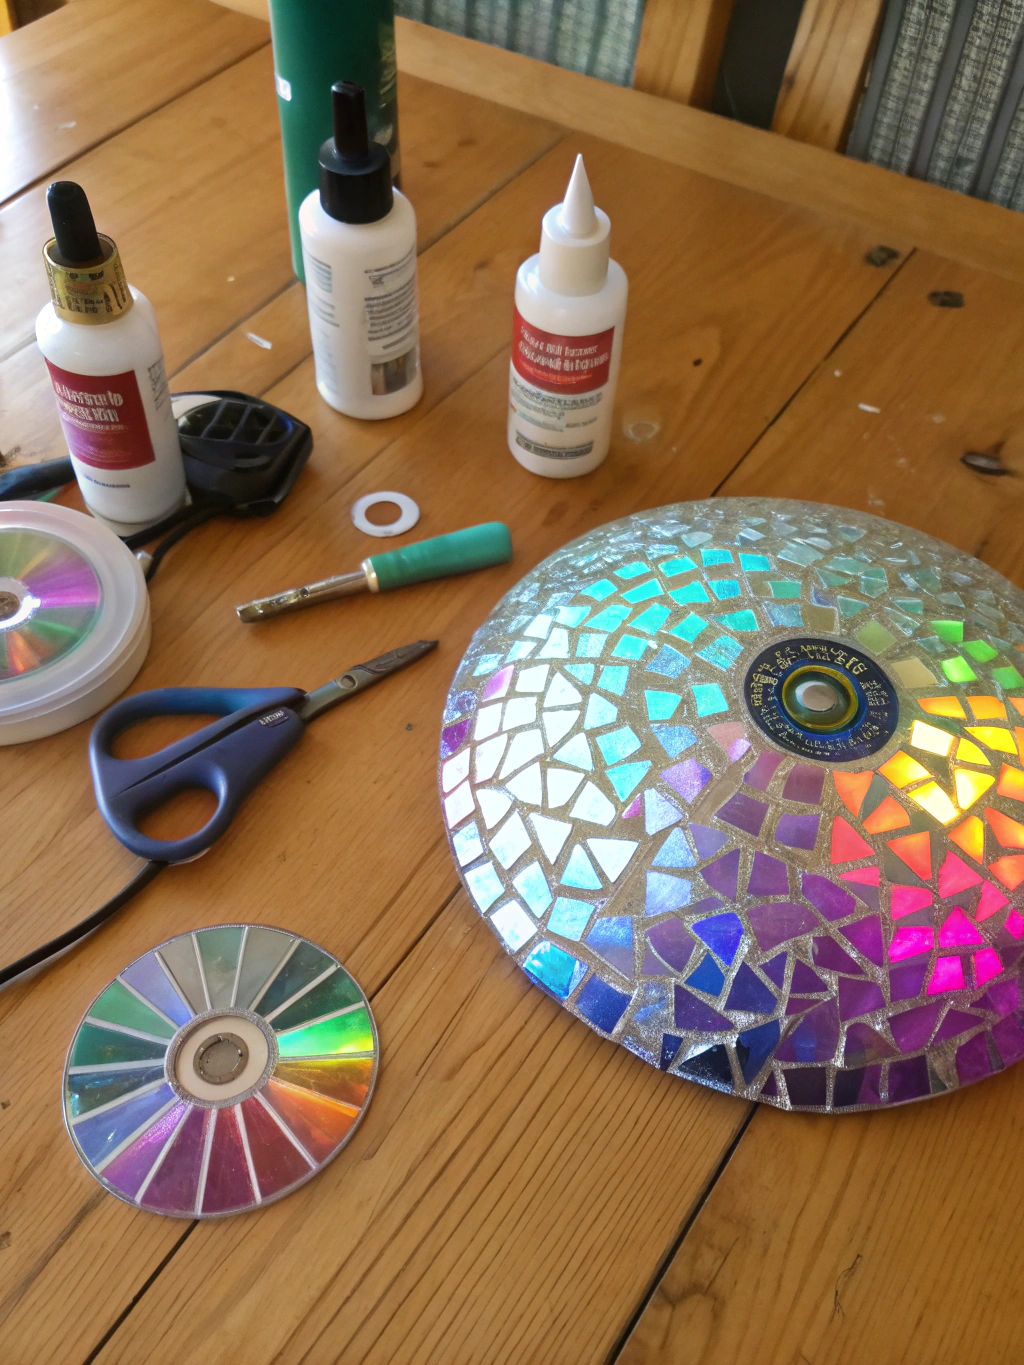
What You’ll Need for Your Old CD Mosaic Projects
Embarking on your old CD mosaic projects adventure is exciting, and thankfully, doesn’t require a massive shopping spree. Most of these items you might already have tucked away in your craft supplies or garage. Gathering everything beforehand makes the creative process much smoother.
 "Old CD Mosaic Projects: 7 Creative DIY Ideas to Try Now! 2")
Here’s a general list of what you’ll typically need: Old CD Mosaic Projects
- Old CDs or DVDs: The stars of the show! The more, the merrier.
- Strong scissors or craft knife: For cutting the CDs. Heavy-duty kitchen shears can also work.
- Safety glasses: Absolutely crucial to protect your eyes from flying CD shards.
- Gloves: To protect your hands from sharp edges.
- A base surface: This could be a picture frame, a flower pot, a tabletop, a mirror frame, a wooden box, or even a piece of sturdy cardboard.
- Strong adhesive: A good quality craft glue like E6000, Weldbond, or a specialized mosaic adhesive. Hot glue can work for some applications but may not be as durable.
- Grout (optional): For a more traditional mosaic look and to fill in the gaps. Choose pre-mixed or powder form.
- Grout spreader or old credit card: To apply the grout.
- Sponge and water: For cleaning off excess grout.
- Old rags or paper towels: For cleanup.
- Pencil or marker: For outlining your design.
- Ruler: For measuring and making straight cuts, if needed.
- Fine-grit sandpaper (optional): To smooth any very sharp edges on CD pieces.
Remember, the specific items might vary slightly depending on which of the old CD mosaic projects you choose to tackle. Always prioritize safety, especially when cutting the CDs!
How to Prepare Your CDs for Mosaic Art
Before you can start creating your masterpiece, you need to prepare your CDs. This is a critical step in learning how to make an old CD mosaic.
Step 1: Cleaning the CDs Old CD Mosaic Projects
First things first, ensure your CDs are clean. Any dust, grime, or fingerprints can interfere with adhesion later on. Simply wipe them down with a soft, lint-free cloth. If they are particularly dirty, a little rubbing alcohol on the cloth can help.
This step is important because a clean surface allows the glue to bond properly with both the CD pieces and your base material. Skipping this can lead to pieces falling off over time, which is a common pitfall for beginners.
(Imagine Step-by-Step Image 1 here if applicable to “Cleaning CDs”, otherwise, this section leads into cutting which is a more visual step)
(For the purpose of this example, let’s assume the provided step-by-step image is for the cutting process as it’s more visually distinct for mosaics)
Step 2: Cutting the CDs into Mosaic Pieces Old CD Mosaic Projects
This is where the magic (and a bit of caution) happens! You’ll be transforming those discs into your mosaic tesserae. There are a few ways to do this. For many recycled CD art projects, the irregular, shattered look is part of the charm.
 "Old CD Mosaic Projects: 7 Creative DIY Ideas to Try Now! 3")
Method 1: Scoring and Snapping (for more controlled breaks) Old CD Mosaic Projects
- Place the CD, shiny side up, on a cutting mat or protected surface.
- Using a craft knife and a ruler, score lines into the CD. You don’t need to cut all the way through.
- Carefully snap the CD along the scored lines. Wear your safety glasses and gloves!
Method 2: Cutting with Strong Scissors Old CD Mosaic Projects
- Put on your safety glasses and gloves. This is non-negotiable, as CDs can shatter and send small, sharp pieces flying.
- Take a strong pair of scissors (craft shears or heavy-duty kitchen scissors work well) and start cutting the CD. It can be a bit tough at first. Some people find it easier to first cut the CD into larger chunks (e.g., quarters) and then cut those into smaller, more manageable mosaic pieces.
- You can aim for uniform shapes like squares or triangles, or embrace a more organic, irregular look. The beauty of old CD mosaic projects is their versatility.
Important Note: Some CDs have a thin plastic film on top of the reflective layer. This might peel off during cutting. You can either remove it or try to glue it back down if it’s integral to the color you want. Experiment with a test CD first.
Common Pitfalls:
- Not wearing safety gear: Tiny, sharp shards of CD can easily cause eye injuries or cuts.
- Using flimsy scissors: This will make the job incredibly difficult and could damage your scissors.
- Expecting perfect cuts: CDs are brittle and can break unpredictably. Embrace the imperfections; they add character to your recycled CD art projects.
If you find the edges are too sharp, you can lightly sand them with fine-grit sandpaper, but be gentle.
7 Creative Old CD Mosaic Project Ideas to Try Now! Old CD Mosaic Projects
Now for the fun part! Here are seven inspiring CD mosaic craft ideas to get your creative juices flowing.
1. Dazzling Mosaic Picture Frame Old CD Mosaic Projects
Transform a plain picture frame into a work of art. This is an excellent beginner project for those new to old CD mosaic projects.
How to:
- Choose your frame: A flat, wide wooden or plastic frame works best.
- Prepare your CD pieces: Cut them into various small shapes. Consider using different colored CDs for more visual interest.
- Arrange your pieces: Lay out your CD pieces on the frame without glue first to plan your design. You can go for a random pattern or try to create specific motifs.
- Glue them down: Apply a small amount of strong craft glue to the back of each CD piece and press it firmly onto the frame. Leave small gaps between pieces if you plan to grout.
- Let it dry: Allow the glue to dry completely according to the manufacturer’s instructions (usually 24 hours).
- Grout (optional): If desired, mix your grout according to package directions (or use pre-mixed). Apply it over the mosaic, pressing it into the gaps with a grout spreader or old credit card.
- Clean excess grout: After about 15-20 minutes (check grout instructions), use a damp sponge to carefully wipe away the excess grout from the surface of the CD pieces. Rinse the sponge frequently.
- Final cure: Let the grout cure completely (usually another 24-72 hours). Buff the frame with a soft, dry cloth to shine up the CD pieces.
This project can add a personalized, shimmery touch to your favorite photos.
2. Sparkling Mosaic Flower Pot or Planter Old CD Mosaic Projects
Give your houseplants a glamorous home! An old CD mosaic flower pot can brighten up any room or garden.
How to:
- Select a pot: Terracotta pots are ideal, but plastic or ceramic ones work too. Ensure the surface is clean and dry.
- Prepare CD pieces: Cut your CDs. For curved surfaces like pots, smaller pieces are generally easier to work with.
- Apply adhesive: Working in small sections, apply adhesive directly to the pot or to the back of the CD pieces.
- Attach CD pieces: Press the pieces onto the pot, following the curve. Leave slight gaps if you plan to grout.
- Dry and Grout: Follow the same drying and grouting steps as for the picture frame. If the planter will be outdoors, consider using an outdoor-friendly grout and sealer.
This is a fantastic way to practice how to make an old CD mosaic on a 3D object.
3. Reflective Mosaic Mirror Border Old CD Mosaic Projects
Enhance a plain mirror by adding a stunning mosaic border made from old CDs. The reflective quality of the CDs complements the mirror beautifully.
How to:
- Protect the mirror: Cover the central mirror surface with paper and painter’s tape to protect it from glue and grout.
- Prepare the frame/border: If your mirror has a frame, use that as your base. If it’s a frameless mirror, you can glue pieces directly onto the mirror edge, but this requires very careful application. Alternatively, create a new frame from wood or sturdy cardboard to mosaic and then attach it around the mirror.
- Design and glue: Plan your design. You could use similar-sized pieces for a uniform look or mix shapes and sizes for something more eclectic. Glue the pieces onto the border.
- Dry and Grout: Allow to dry thoroughly. Grouting is highly recommended here to give it a finished look and fill any uneven gaps around the reflective CD pieces. Follow the standard grouting procedure.
- Clean and unveil: Once the grout is cured, carefully remove the protective paper and tape. Clean any smudges from the mirror.
This recycled CD art project can become a real statement piece in your entryway or bathroom.
4. Upcycled CD Mosaic Projects
Practical and pretty! Create a set of unique coasters that will protect your furniture and spark conversation.
How to:
- Choose a base: Square ceramic tiles (around 4×4 inches) are perfect bases for coasters. You can also use pieces of thick cork or smooth, flat wood.
- Cut CD pieces: Cut very small pieces of CDs for this project. Intricate patterns can be fun here.
- Glue: Arrange and glue your CD pieces onto the coaster base. Try to keep the surface as flat as possible.
- Dry and Grout: Let the glue dry. Grouting is essential for coasters to create a smooth, level surface and protect the CD edges.
- Seal (important!): After the grout has cured, apply a waterproof sealer to protect your coasters from moisture. This is crucial for functionality. You might also want to add cork or felt backing to prevent scratching furniture.
These make great handmade gifts and are a fun way to experiment with different CD mosaic craft ideas on a smaller scale.
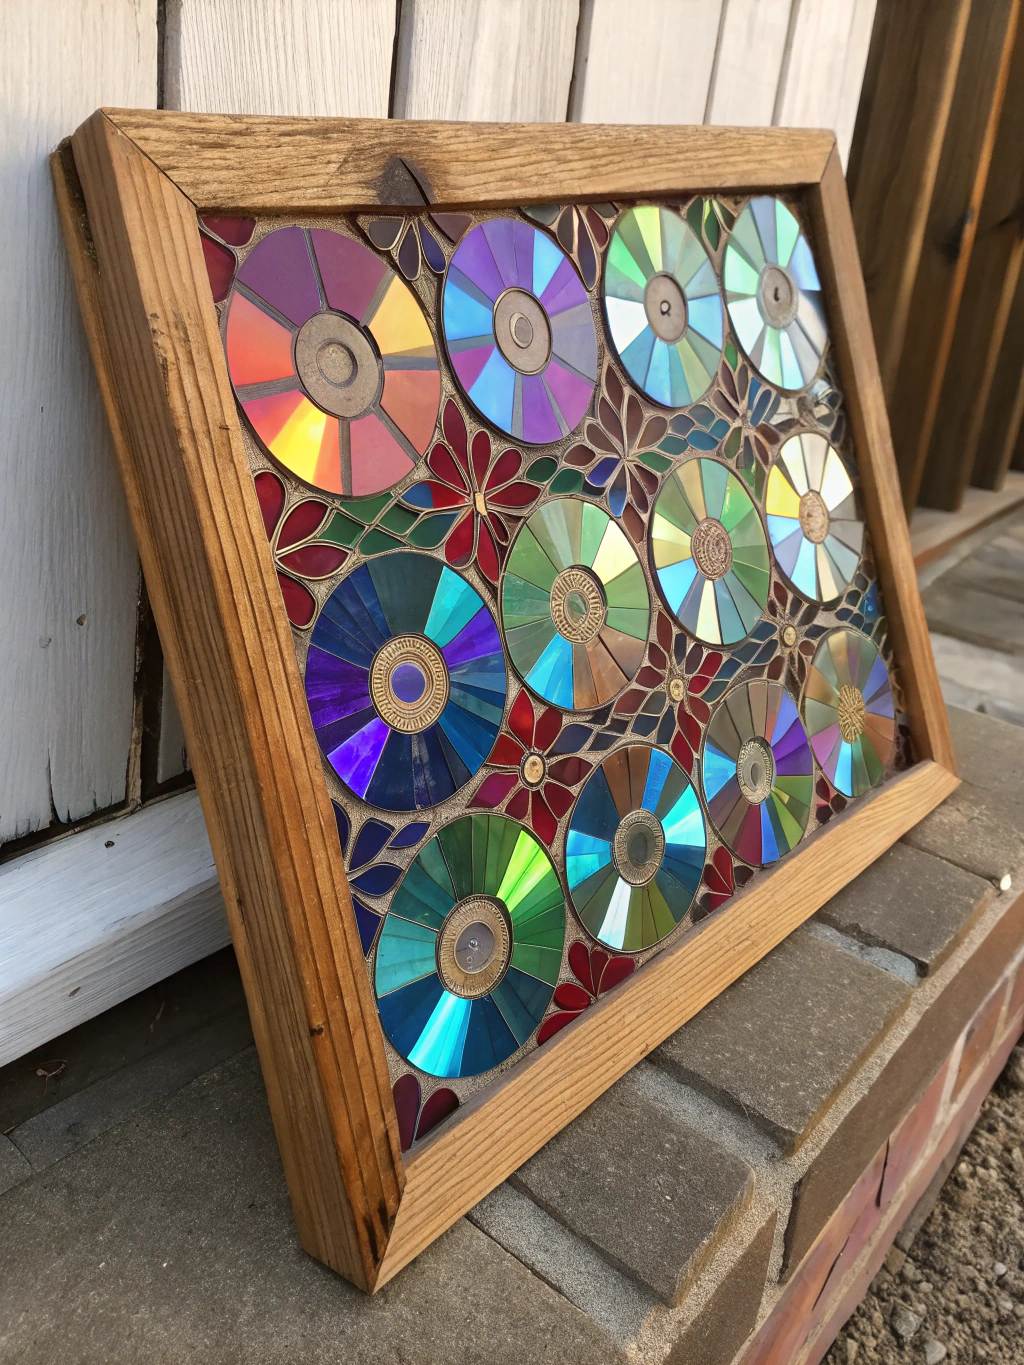
5. Artistic Mosaic Wall Art or Panel Old CD Mosaic Projects
Feeling ambitious? Create a larger piece of wall art. This allows for more complex designs and can be a stunning focal point.
How to:
- Choose a backing: A piece of plywood, MDF board, or even an old canvas can serve as your base. Prime it if necessary.
- Plan your design: Sketch your design onto the board. This could be an abstract pattern, a landscape, an animal, or anything you can imagine. Consider the colors of your CDs – the rainbow sheen can be used to great effect.
- Cut and sort CD pieces: You might want to cut pieces of different sizes and sort them by color (if separating the film layers) or by reflective quality.
- Apply mosaic: Work in sections. Apply glue to a small area of your board and then place your CD pieces. This is where your creativity truly shines.
- Dry and Grout (optional but recommended for larger pieces): Grouting will give it a cohesive, professional look and add durability. For very large pieces, grouting in sections might be easier.
- Frame (optional): Once finished and cured, you can frame your mosaic panel for a polished look.
This type of old CD mosaic project truly transforms trash into treasure. For more inspiration on upcycling, check out these genius upcycling ideas from Good Housekeeping; they offer a wealth of knowledge on “CD mosaic craft ideas, How to make an old CD mosaic, Recycled CD art projects”.
6. Shimmering CD Mosaic Jewelry Box
Upgrade a plain wooden or cardboard jewelry box with a touch of CD mosaic magic.
How to:
- Prepare the box: Ensure the surfaces you want to mosaic are clean. If it’s a (un)painted wooden box, a light sanding might help the glue adhere.
- Cut small CD pieces: Smaller pieces will be easier to apply to the contours of a box.
- Glue pieces: Carefully glue the CD pieces onto the lid and/or sides of the box. You can cover the entire surface or create accent patterns.
- Dry and Grout: Allow the glue to dry. Grouting is recommended, especially if there are many small gaps, to create a smoother finish. Be careful when grouting around hinges or clasps.
- Seal (optional): If desired, you can seal the mosaic surface for extra protection, especially if the box will be handled frequently.
This project not only offers a beautiful storage solution but is also a lovely example of recycled CD art projects.
7. Outdoor CD Mosaic Garden Orb or Stepping Stone
Add a touch of iridescent sparkle to your garden with a CD mosaic garden orb or stepping stone.
For a Garden Orb:
- Find a base: A bowling ball (check thrift stores!), a large styrofoam ball, or a gazing ball globe can work.
- Prepare CDs and glue: Cut CD pieces. Use a strong, waterproof adhesive suitable for outdoor use.
- Apply mosaic: Glue the pieces all over the orb. Smaller pieces will conform better to the curve.
- Grout with outdoor grout: Use an outdoor-grade grout and seal it thoroughly with a waterproof sealer once cured to protect it from the elements.
For a Stepping Stone:
- Use a stepping stone mold or a pre-made plain concrete stone: If making your own, press CD pieces into the wet concrete.
- Or, mosaic an existing stone: If using a pre-made stone, clean it well and glue CD pieces to the top surface.
- Grout and Seal: Use outdoor grout and seal well. Ensure the surface isn’t too slippery if it will be walked on regularly. For stepping stones, embedding the pieces slightly into the grout can help with durability.
These outdoor old CD mosaic projects can withstand the elements if properly sealed, bringing a unique glimmer to your outdoor space. Learning how to make an old CD mosaic for the garden is particularly rewarding.
The Final Result: Your Dazzling Creation!

And there you have it! After some cutting, gluing, and maybe a bit of grouting, you’ve transformed a pile of old CDs into a beautiful, shimmering piece of art. Whether it’s a dazzling picture frame, a sparkling planter, or a unique piece of wall decor, your old CD mosaic project is sure to catch eyes and start conversations.
The beauty of these projects lies not just in the final product, but in the process of creation and the satisfaction of upcycling something old into something new and exciting. Each piece will be unique, reflecting your personal style and creativity.
We’d love to see what you’ve made! Share pictures of your old CD mosaic projects in the comments below, or tag us on social media. If you have any tips or tricks you discovered along the way, please share those too!
Pro Tips & FAQs for Old CD Mosaic Projects
Here are some extra tips and answers to frequently asked questions to help you on your mosaic journey.
H2: Essential Pro Tips for Amazing CD Mosaics
- Vary CD Colors: Not all CDs are created equal in their iridescence. Some have more blues and purples, others more greens and yellows. Mix them up for a richer effect, or sort them if you want a specific color palette.
- Cutting Direction Matters: Experiment with cutting CDs in different directions. Cutting across the “grain” can sometimes yield different color refractions.
- Work in Good Lighting: The reflective nature of CDs can be tricky. Good lighting helps you see your design and ensure pieces are placed accurately.
- Consider the “Dark Side”: The printed side of CDs can also be used for a different, often more graphic, effect in your recycled CD art projects.
- Patience is Key: Mosaicking takes time, especially intricate designs. Don’t rush the process. Enjoy the mindful activity of placing each piece. For more extensive DIY knowledge check out our other old CD mosaic projects.
H2: Frequently Asked Questions (FAQs)
Q1: What’s the best glue for old CD mosaic projects?
A: A strong, clear-drying craft glue like E6000, Weldbond, or a specialized mosaic adhesive is generally best. Hot glue can work for temporary or very light-duty projects, but it’s not as durable and can melt in heat. Always check if the glue is suitable for plastics and your chosen base material.
Q2: Do I really need to grout my CD mosaic?
A: Grouting is highly recommended for most **old CD mosaic projects**, especially those that will be handled, exposed to moisture (like coasters or outdoor items), or if you want a more professional, finished look. Grout fills the gaps, secures the pieces, and smooths the surface. However, for some purely decorative, delicate wall art, you might choose to skip it if you like the look of the gaps.
Q3: How do I clean a finished CD mosaic piece?
A: For general dusting, a soft brush or microfiber cloth works well. If it needs more cleaning (e.g., a grouted piece), use a damp cloth with a mild soap. Avoid abrasive cleaners as they could scratch the CD pieces or damage the grout over time.
Q4: Can I use DVDs instead of CDs for CD mosaic craft ideas?
A: Absolutely! DVDs work just as well as CDs. They often have a similar iridescent quality. Sometimes their layers separate more easily, which can be good or bad depending on what you’re trying to achieve. Always test-cut one first.
Q5: Are there any safety concerns when making recycled CD art projects?
A: Yes, the main concern is when cutting the CDs. They can shatter and send small, sharp pieces flying. **Always wear safety glasses.** Gloves are also highly recommended to protect your hands from cuts. Work in a well-ventilated area if using strong adhesives. If you’re exploring various [“CD mosaic craft ideas, How to make an old CD mosaic, Recycled CD art projects”](https://www.goodhousekeeping.com/home/craft-ideas/how-to/g139/genius-upcycling-ideas/), you’ll find safety is a common emphasis.
So, are you ready to raid that old CD spindle and start creating? These old CD mosaic projects are a fantastic way to combine your love for DIY with eco-conscious crafting. Don’t let those old discs gather dust any longer – turn them into something dazzling!
We hope these ideas and tips have inspired you. Which project will you try first? Let us know in the comments below! If you found this guide helpful, please consider sharing it with your fellow DIY enthusiasts or signing up for our newsletter for more creative upcycling ideas and home improvement tips. Happy crafting!

